Index List

03 June 2009

Linux Mint Gloria on Toshiba Portege 4010

Linux the more light, this is evidenced by Linux Mint 7 (Gloria) that are running smoothly in the Toshiba Portege 4010 laptop (P3 933GHz, 256 MB RAM, 30 GB HDD)

Linux Mint 7


Install process does not have a problem, the main problem in the only resolution that can not be made because the 1024 × 768 maximum resolution option most high 800 × 600. Finally, the problems can be resolved with edit the file /etc/X11/xorg.conf as :

Section “Files”
FontPath “/usr/share/X11/fonts/misc”
FontPath “/usr/share/X11/fonts/cyrillic”
FontPath “/usr/share/X11/fonts/100dpi/:unscaled”
FontPath “/usr/share/X11/fonts/75dpi/:unscaled”
FontPath “/usr/share/X11/fonts/Type1″
FontPath “/usr/share/X11/fonts/100dpi”
FontPath “/usr/share/X11/fonts/75dpi”
FontPath “/var/lib/defoma/x-ttcidfont-conf.d/dirs/TrueType”
# path to defoma fonts
EndSection

Section “Monitor”
Identifier “Generic Monitor”
Option “DPMS”
HorizSync 37,9-68,7
VertRefresh 60-85
EndSection

Section “Screen”
Identifier “Default Screen”
Device “Trident Microsystems CyberBlade/Ai1″
Monitor “Generic Monitor”
DefaultDepth 16
SubSection “Display”
Depth 1
Modes “1024×768″ “800×600″
EndSubSection
SubSection “Display”
Depth 4
Modes “1024×768″ “800×600″
EndSubSection
SubSection “Display”
Depth 8
Modes “1024×768″ “800×600″
EndSubSection
SubSection “Display”
Depth 15
Modes “1024×768″ “800×600″
EndSubSection
SubSection “Display”
Depth 16
Modes “1024×768″ “800×600″
EndSubSection
SubSection “Display”
Depth 24
Modes “1024×768″ “800×600″
EndSubSection
EndSection

Section “Module”
Load “bitmap”
Load “dbe”
Load “ddc”
Load “dri”
Load “extmod”
Load “glx”
Load “int10″
Load “record”
Load “type1″
Load “v4l”
Load “vbe”
EndSection

Section “DRI”
Mode 0666
EndSection

Section “Device”
Identifier “Trident Microsystems CyberBlade/Ai1″
Driver “trident”
BusID “PCI:1:0:0″
VideoRam 16000
Option “UseFBDev” “true”
EndSection

Section “ServerFlags”
Option “DontZap” “False”
EndSection


Second problem is in the wireless, but the problem is easily resolved with ndiswrapper

How To Install Printer Driver Epson LX-300 in Ubuntu

The following steps to install the driver printer Epson LX-300 in Linux Ubuntu
  1. Open System → Administration → Printing → New Printer, in select connection Device select Gutenprint parallel port #1, clcik Forward
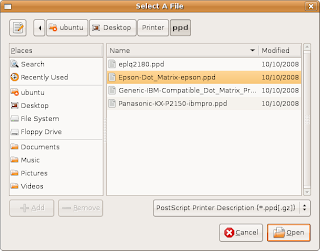
  2. Choose PPD file
  3. Download PPD file from Epson-Dot Matrix-epson.ppd
  4. Give name LX-300 and click Apply
  5. Properties on printer dan click chage model
  6. Select “Select Printer from Databese” and choose Epson → Forward
  7. Choose “Dot Matrix” and “Epson the Teat of Matrix Foomatic/eps9mid” → Forward
  8. Choose “Use the new PPD (Postscript Printer Description) the USA is” → Forward
  9. Apply
  10. Pilih resolusi 240×216.dpi. → Apply
  11. Good Luck

Send SMS from Linux PC

Be happy that you use a Sony Ericsson (I already try and please try another brand), other than the fact we can smsan through the hp keypadnya numeric we can also dilinux sms through your PC (I have Ubuntu try) there is software that is not Wammu sms that we can from Wammu have other functions such as delete / write contact, calendar etc. first step -> connect you with the HP PC> directly configurasi and have the menu as usual next2 to finish (I g appear directly open the menu Wammu d>> PhoneWizard)

And to have the HP brand in the other do not worry Any configuration steps also have to brand Noki, Siemen, samsung, Alcatel, sharp, and also the HP-based Symbian, if the trademark has not been registered first try not despair

I certainly did not need to install any drivers to make this connection

Tips To Make Your Linux Error

The following results fad that I do on Ubuntu 9:04. Error results found. If you want to do the error linux you later, please do the following steps :

  1. Close all applications and open a terminal and navigate to the directory /tmp
    $ cd /tmp
  2. Then type the command
    $ chmod-x *-rv
  3. Seems not the dangerous, the only change that permission will not be executable, but the effect was very unusual, if you do not believe, open Synaptic Package Manager and see the result .. :D
Do not afraid this error solved by inverse command $ chmod + x * or restart your computer. :D

Fish Swimming in the GNOME Desktop

Want to make your Ubuntu GNOME desktop aquarium to be? Please try the following steps:
  1. Press the ALT + F2
  2. Type "free the fish" without quotes
  3. You will see the fish swimming-pool in the desktop and you will go if you click
Or
  1. Right Click on the GNOME panel 2. Select About GNOME
  2. After the show's dialogue, press the F 3x
Selamat mencoba